NiMHLFO
-
 May 22, 2022
- edited: Mar 07, 2023
I designed an LFO module that oscillates by charging and discharging a rechargeable nickel-metal hydride AA battery and made a little “ad” video about it.
The video embedded here is on my TILvids channel. You can also find it on Youtube here but I recommend TILvids since they don’t track you or force ads down your throat.
Disclaimer⚠️
This is not a proper battery charging circuit. It charges the batteries with a constant current instead of a more sophisticated CC/CV charging circuit, which means it will probably shorten the lifespan of your NiMH batteries when used. This also means the LFO’s frequency increases to a couple of hours per cycle (if I remember correctly, it’s been a while since I last used it) after the first discharge cycle because the battery isn’t being charged properly.
Also ONLY USE THIS WITH RECHARGEABLE NiMH BATTERIES. NORMAL ALKALINE BATTERIES WILL LEAK IF YOU TRY TO CHARGE THEM
Schematic
I haven’t drawn a KiCad schematic for this module. Here is the circuit in the falstad circuit simulator: https://url.sandelinos.com/nimh
Stripboard layout
If you want to build this module yourself here is the stripboard layout. The transistors used are 2N3904
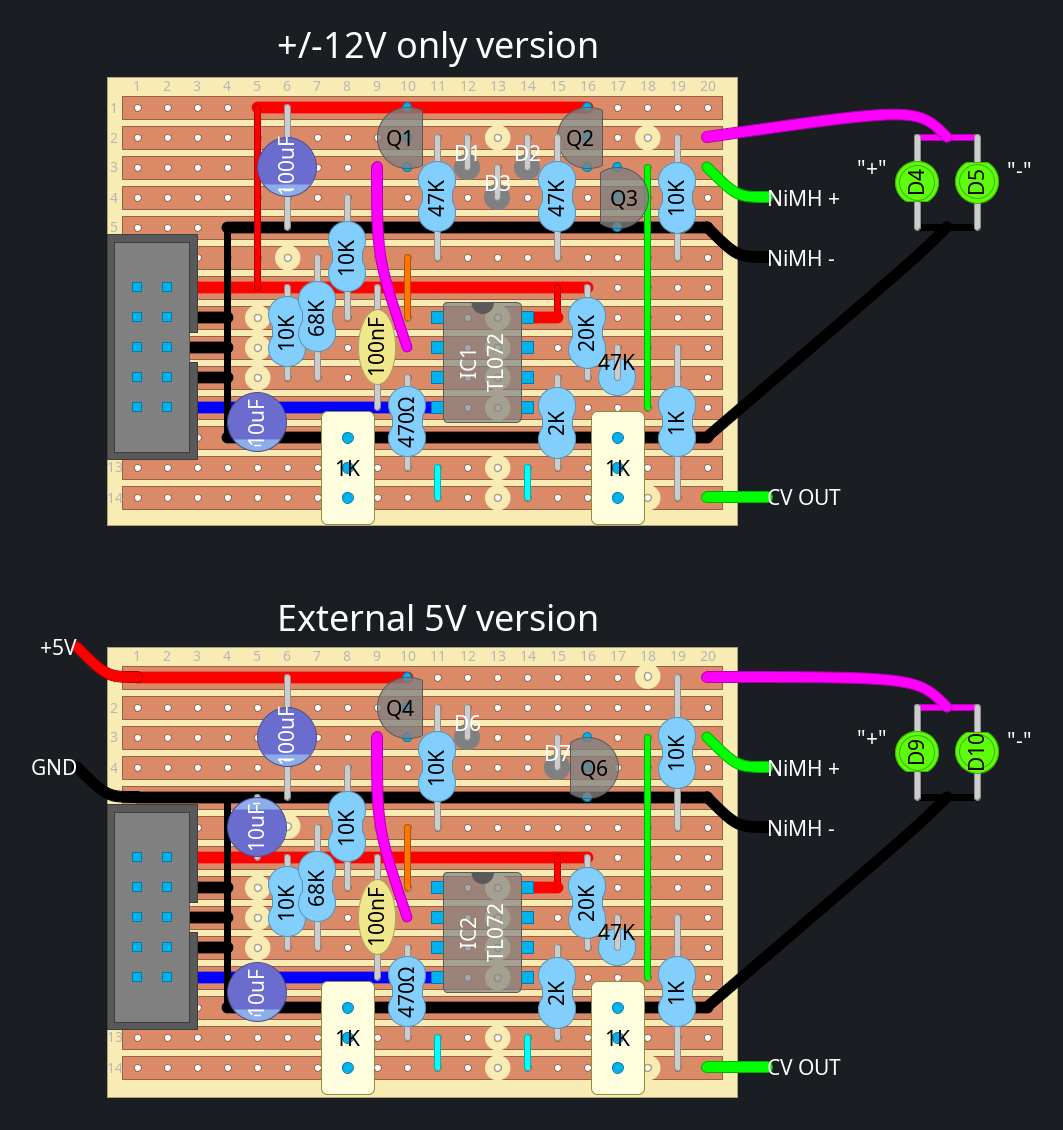
The one I built is the external 5V version but I also tested the +/-12V only
version on breadboard and it works fine (although it wastes even more power).
The 12V version uses 2 parallel transistors for charging because at the higher
voltage a single one can’t dissipate the wattage. (12V - 1.2V) * 0.1A = 1.08W
and the 2N3904 is rated for only 625mW.
Calibration
-
Put in a fully charged NiMH battery.
-
Turn the left trimmer until the
+LED lights up. (Direction depends on which way you soldered the trimmer, you can just try both directions) -
Turn the trimmer in the same direction for a couple more turns.
-
Wait a minute for the voltage to stabilize. If the
-LED lights up, turn the trimmer more in the same direction. -
Slowly turn the left trimmer in the opposite direction just until the
-LED lights up and stop.Now you’ve calibrated the charging circuit. Next we will calibrate the output.
-
Connect a voltmeter to the output jack.
-
Adjust the right trimmer until you measure roughly 8 volts on the voltmeter if you want unipolar output or roughly 4 volts if you want bipolar output.